Containers
Containers are a way to package together your application along with it's dependencies, and run in a resource isolated process. They provide consistency across different hosts, efficiency over traditional hosting methods, and facilitate a micro-service based approach, where each logical piece of your application is split into multiple, easily testable parts (such as API, Backend, Frontend, etc).
The Containers & Container Dashboard
The containers dashboard shows all containers for an environment and information about the state they are in.
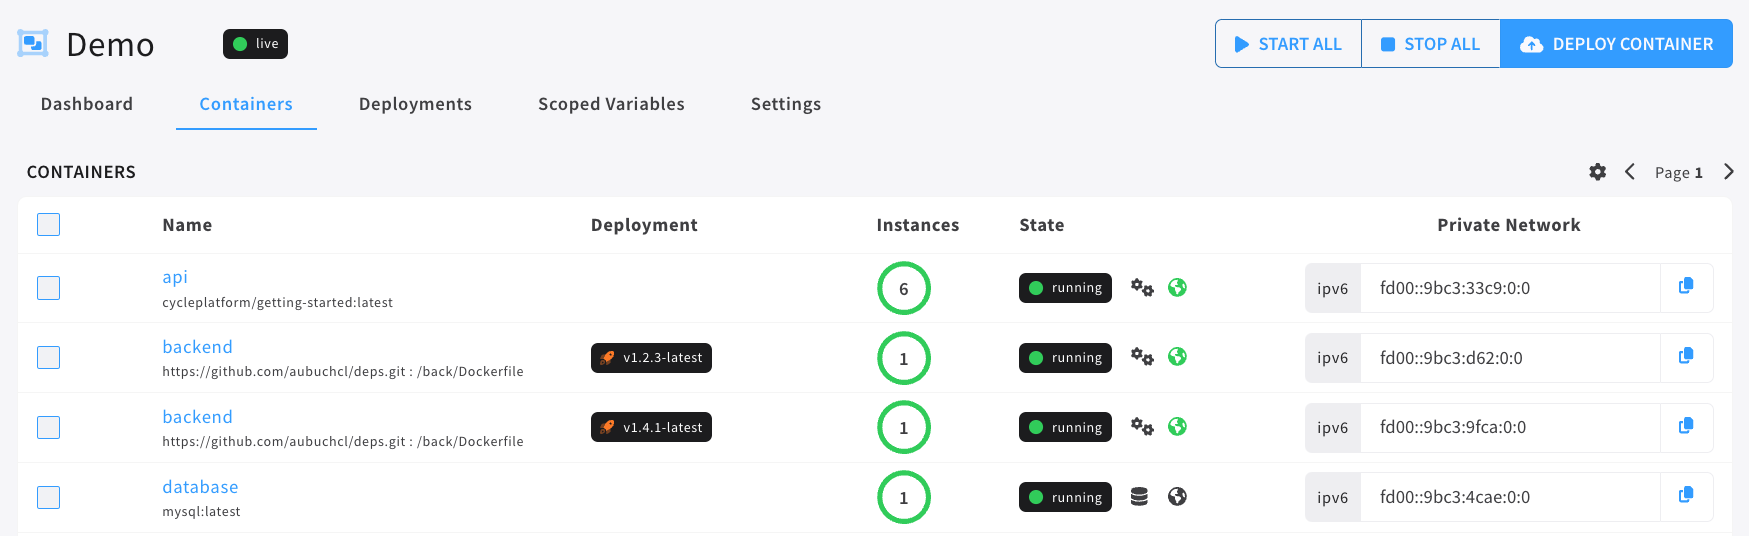
- The containers tab is available once a user has entered any environment, by means of the horizontal navigation.
- Most information on this page is obvious, but these icons represent the state setting for the container row. The gears represent stateless, while the server represents stateful.
- Filter the containers shown by their state.
By clicking on the name of any given container a modal will open showing a new full menu for the given container. We call this initial page you'll land on, the container dashboard.
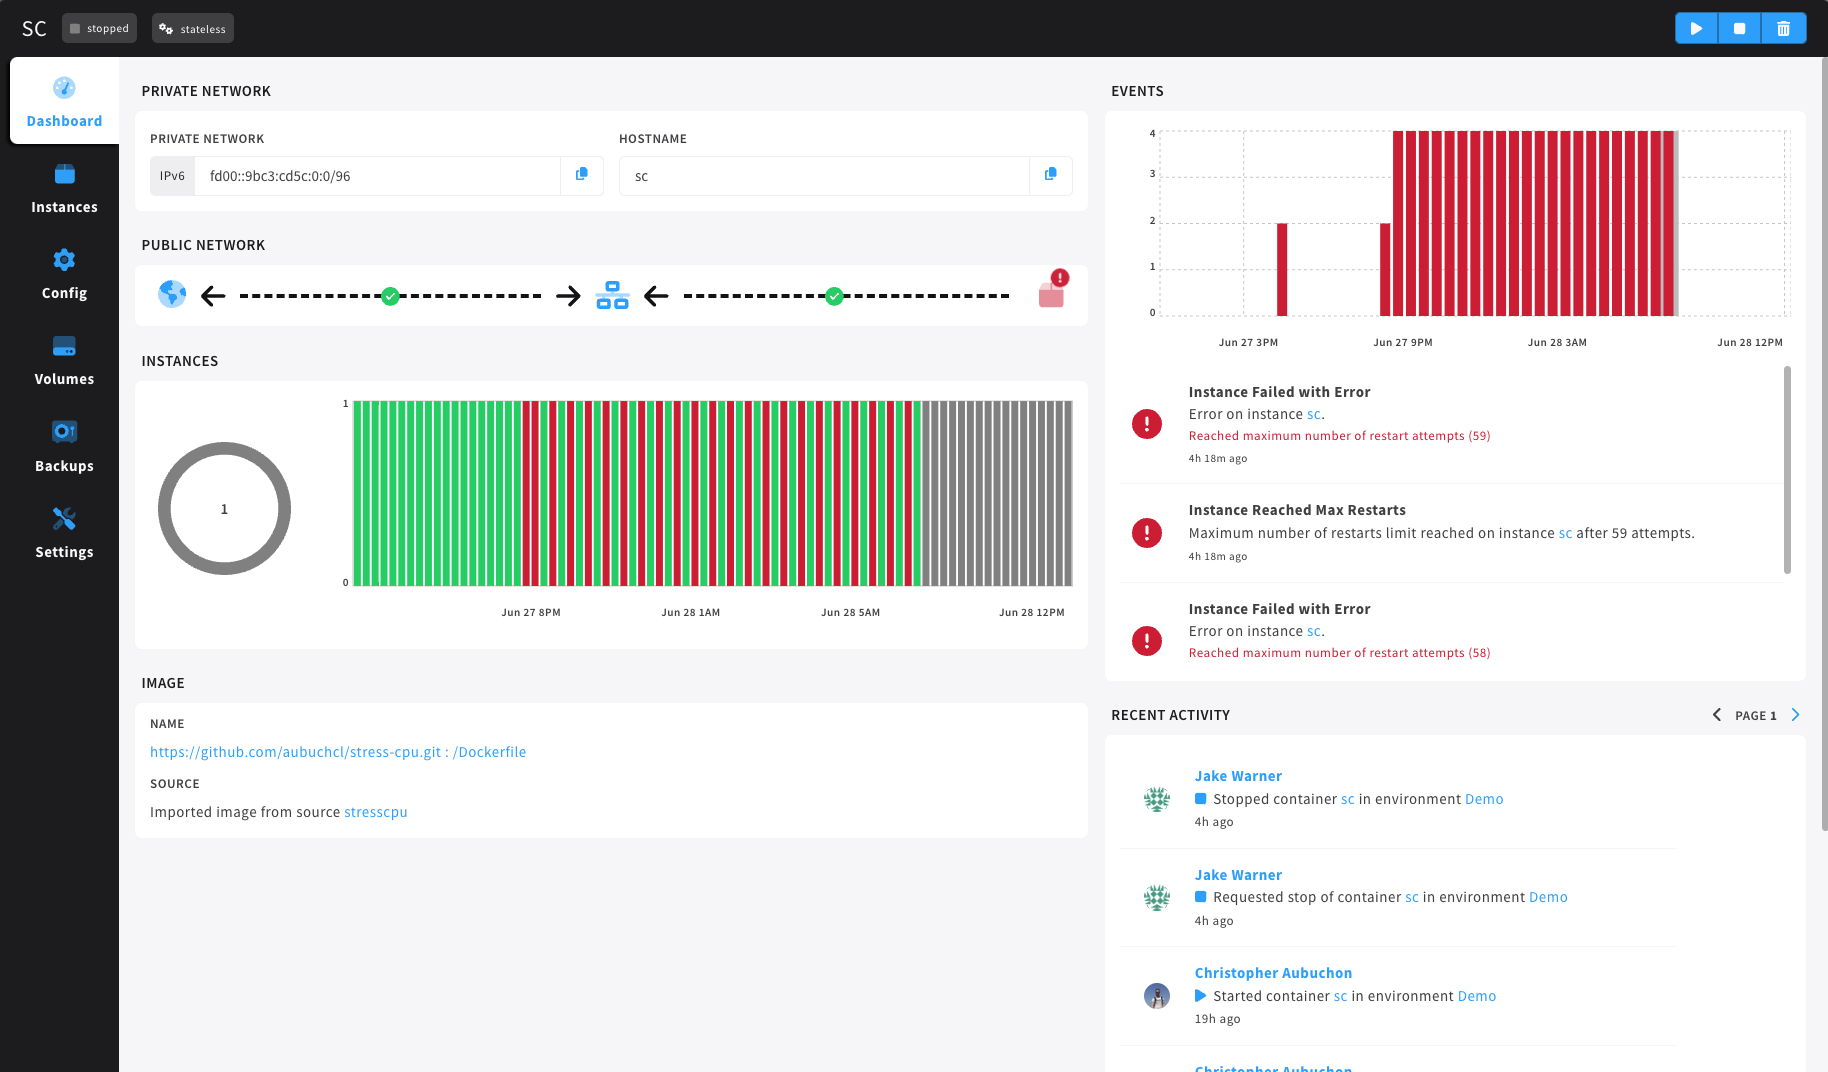
The container dashboard is a central point of view for high level container information. Users will see private and public network settings, including a helpful network graph. Below that an instances graph shows the state and number of instances for the container.
In the Image section of this page, users can find helpful information about the container image this container is using.
The Events graph outlines important events that are specifically relevant to this container, and below that a full activity log for the container is present.
Other menus available in this modal are:
- Instances - with instance level information.
- Config - where a user can change the configuration settings for the container.
- Volumes - for containers with volumes attached, where settings can be updated and applied.
- Backups - for stateful containers with backups enabled, where backups can be viewed and restored.
- Settings - where containers settings can be updated and applied.
If you have questions on converting to containers, or would like some help getting an application containerized, reach out to our support team on Slack. We're happy to help!
Deploy A Single Container
Cycle provides a completely UI based form to deploy individual containers. It provides a quick and easy way to get a container online without much configuration. Once the container is created, you will be able to modify any part of it's configuration to a fine degree. We've created a great container to go along with this guide cycleplatform/getting-started that can be used during the image import step. To get started, follow these steps:
- Describe the container, and provide initial information about the deployment.
- Select or import a new image.
- Configure Public Access including hostname.
- Verify everything is correct and deploy.
Step 1: Describe The Container And It's State Settings
Container Name
The name of a container is for user purposes only, and doesn't affect any other aspect of the container. However, on this form, Cycle will automatically prefill the hostname of the container with a formatted version of the name for convenience. You are free to change the hostname without affecting the name.
State
Choose Stateful or Stateless for your container. A Stateful container is a container that has a persistent volume, or the volume will hold state between restarts. A Stateless container can have a volume, but that volume will be cleared between starts.
Initial Instances
The instance slider tells Cycle exactly how many copies of the container you want to run when it starts. Based on the deployment strategy you set, Cycle will automatically balance the instances across your cloud.
Deployment Strategy
Depending on the tier you've chosen you may have access to different advanced deployment strategies. Choose a deployment strategy for the container. Each time an instance of the image is created Cycle will follow the deployment strategy when choosing a server to start the container on.
Platform Default
The platform default is currently Resource Density, but by choosing Platform Default you are saying that you would like Cycle to decide what the deployment strategy will be going forward.
Resource Density
The Resource Density deployment strategy looks at the servers and deploys instances based on the resource usage of servers that match tag constraints.
High Availability
The High Availability deployment strategy will spread out the instances as much as possible across the infrastructure.
Function
The function deployment strategy is the only deployment strategy that has an impact on how the container is managed by the platform. For more information visit the functions page.
Manual
The manual deployment strategy give you full control over where your instances are deployed an unlocks the ability for a user to delete individual instances.
First Available
The First Available deployment strategy will deploy the instances to the server that is available first.
Set Tags
If you want to be descriptive about which servers this container will be deployed to use tags.
Any Tags- Instances will deploy to any server with at least one of the tags listed.
All Tags- Instances will only be deployed to a server that has every tag listed here.
Step 2: Select an Image
Select an image thats already been imported from the "Recent Images" selection or choose an existing image source and create a new image from that source for this deployment.
Step 2.1: Configure Volumes
Some container images may specify volumes (persistent data storage). Cycle will automatically detect these and ask you to configure them.
Path - The path is automatically determined by the image, and cannot be changed.
Max Size - Containers will grow to the max size set. Since this is a limit and not an allocation, it is possible that the volume won't have enough data to grow to the max size.
If an image does not have a volume defined, Cycle will not show an option to configure the volume or to "add" a volume during container create. To make the volume configuration an option add a VOLUME to the Dockerfile.
If you're using an official image and expect that you should find a volume on the image, yet Cycle doesn't show that one is defined, it is not defined on the image.
To add a volume to an official image simply create the following Dockerfile:
FROM official:image
VOLUME /path/you/desire
After creating the image, you can host it in a repo and use the docker-file image source type to pull it into Cycle, or you can build it locally and push to DockerHub or any supported Docker Registry before pulling it into Cycle.
Step 3: Configure the Network
Hostname
The hostname is the string that all other containers within the same environment can refer to it by. It must be lowercase, and only contain letters, numbers, and hyphens.
Public Network
There are three types of network privilege a container can have:
- Disabled - Public internet access is completely disabled for this container. It may only communicate with other containers within the same environment. This is ideal for sensitive things, such as databases.
- Egress Only - The container may initiate connections over the internet, but all incoming connections will be blocked. This is ideal for things that require fetching data from the web, but do not need to respond to inbound requests, such as web scrapers.
- Enabled - The container is able to both start and accept connections over the internet. This is a must for websites, APIs, and other services where clients may not be known ahead of time.
Step 4: Deployments
Setting up deployments requires a bit of understanding. You can get much more info on deployments here.
For this form, you can either select an existing deployment or create one by entering the deployment name in the form.
Step 5: Finalize
Verify everything is correct in the deployment summary box on the right, then click the "Create Container" button, located on the bottom right side of the form. All of these options will be fully configurable after creation as well, so if you make a mistake you can easily correct it before starting the container.